Description
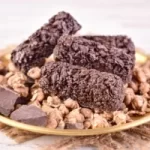
These homemade chocolate granola bars are the perfect combination of wholesome oats and indulgent chocolate. They make for a satisfying snack or quick breakfast on busy mornings. Plus, they’re easy to make and customizable to suit your taste preferences.
Ingredients
Scale
- 1 cup rolled oats
- 1/4 cup chopped nuts (such as almonds, walnuts, or pecans)
- 1/4 cup shredded coconut
- 1/4 cup honey or maple syrup
- 2 tablespoons coconut oil
- 2 tablespoons cocoa powder
- 1/4 teaspoon vanilla extract
- Pinch of salt
- Optional add-ins: chocolate chips, dried fruit, seeds (chia, flax, sunflower), or protein powder
Instructions
Step 1: Prepare the Base
- Preheat your oven to 350°F (175°C). Line a baking dish with parchment paper.
- In a large bowl, combine the rolled oats, chopped nuts, and shredded coconut.
Step 2: Make the Chocolate Sauce
- In a small saucepan over low heat, combine the honey or maple syrup, coconut oil, cocoa powder, vanilla extract, and a pinch of salt.
- Stir continuously until the mixture is smooth and well combined. Remove from heat.
Step 3: Combine and Bake
- Pour the chocolate sauce over the oat mixture and stir until everything is evenly coated.
- Transfer the mixture to the prepared baking dish and press it down firmly with a spatula or your hands to form an even layer.
- Bake in the preheated oven for 10-12 minutes, or until the edges start to turn golden brown.
Step 4: Cool and Slice
- Allow the granola bars to cool completely in the baking dish.
- Once cooled, use a sharp knife to slice them into bars or squares.
- Store the chocolate granola bars in an airtight container at room temperature for up to one week.
Equipment
 Buy Now →
Premium Nonstick Baking Sheet Pans
Buy Now →
KEGOUU Oven Mitts and Pot Holders
Buy Now →
Nuwave Bravo Air Fryer Toaster Smart Oven
Buy Now →
Boxiki Kitchen Nonstick Ceramic Baking Sheet
Buy Now → Buy Now →
 Notes
- Pressing Firmly: When transferring the mixture to the baking dish, press it down firmly using a spatula or your hands. This compaction ensures the bars stick together after baking.
- Cooling Completely: Allow the granola bars to cool completely in the baking dish before slicing. This cooling process helps them set properly and prevents crumbling.
- Storage: Store the cooled bars in an airtight container at room temperature. If the weather is warm, consider placing a piece of parchment paper between layers to prevent sticking.
- Prep Time: 15 minutes
- Cook Time: 10 minutes
- Category: Stress-Busting