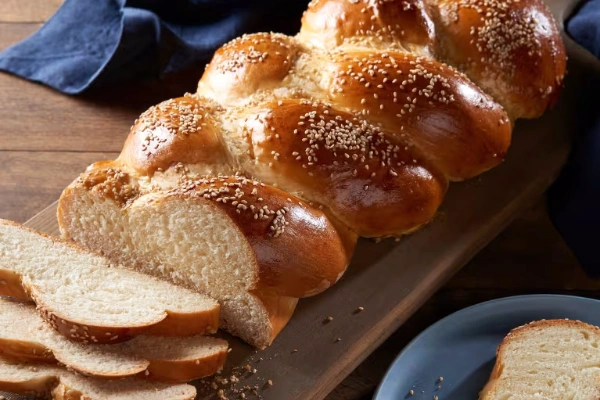
Pumpkin Challah is a delightful variation of the traditional Jewish braided bread, enriched with the flavors and colors of pumpkin. This autumn-inspired twist on the classic Challah combines the soft, airy texture of traditional Challah with the earthy sweetness of pumpkin puree. The addition of pumpkin not only imparts a beautiful golden-orange hue to the bread but also infuses it with subtle notes of pumpkin flavor, making it a perfect treat for the fall season.
The dough for Pumpkin Challah is typically made with basic ingredients such as flour, water, yeast, sugar, and oil, just like regular Challah. However, it incorporates pumpkin puree, which adds moisture and a hint of sweetness to the bread. Some recipes may also include spices commonly associated with pumpkin dishes, such as cinnamon, nutmeg, and cloves, to enhance the flavor profile. The result is a fragrant, slightly sweet bread with a tender crumb and a rich, golden color.
Pumpkin Challah can be enjoyed in a variety of ways. It is delicious on its own, served warm with a slice of butter or drizzled with honey. It also pairs perfectly with savory dishes. In addition, leftover pumpkin cheese can be used to make French toast, bread pudding, or even savory sandwiches, adding a unique flavor to these dishes.

What are the Benefits of Pumpkin Challah?
Pumpkin Challah has several benefits that make it a unique bread option, especially in the fall. One of the main benefits is its nutritional value. Pumpkin is rich in vitamins and minerals, especially Vitamin A, which is essential for good vision, a healthy immune system, and proper functioning of the heart, lungs, and kidneys. By adding pumpkin puree to Challah Bread, you’ll not only be enjoying a delicious bread, but you’ll also be supplementing it with nutrients that contribute to overall health.
Another benefit of Pumpkin Challah is the moist, tender texture. The natural moisture in pumpkin puree helps the bread stay soft and fresh for a long time. This means the bread stays flavorful even after baking for days, reducing waste. Pumpkin also adds a subtle sweetness to the bread, making it a great tasting treat that can be enjoyed on its own or with sweet and savory condiments.
Pumpkin Challah is visually stunning and is the center of attention at the table. The earthy sweetness of pumpkin and the addition of warm spices such as cinnamon, nutmeg and cloves add to the flavor of pumpkin bread. These flavors evoke the comforting essence of fall, making Pumpkin Challah perfect for parties.

Welcome To My Kitchen! Let’s Make Pumpkin Challah!
Step 1: Prepare the Dough
In a large mixing bowl, dissolve the yeast and sugar in warm water and let it sit for 5-10 minutes until it becomes frothy. Then, add the pumpkin puree, vegetable oil, 2 eggs, salt, cinnamon, and nutmeg to the yeast mixture and mix thoroughly. Gradually incorporate the flour, one cup at a time, mixing well after each addition until a soft dough forms.

Step 2: Knead and Rise
Transfer the dough to a floured surface and knead for 8-10 minutes until it becomes smooth and elastic. Then, place the dough in a greased bowl, cover it with a clean kitchen towel or plastic wrap, and let it rise in a warm place for 1-1.5 hours, or until it has doubled in size.

Step 3: Shape the Challah
After the dough has doubled in size, punch it down to release the air bubbles. Split the dough into two equal portions, then divide each portion into three parts and roll them into 16-inch ropes. Braid the ropes into two loaves, tuck the ends underneath, and place them on a parchment-lined baking sheet. Cover the loaves with a clean kitchen towel and let them rise for another 30-45 minutes until they become puffy.

Step 4: Bake
Preheat the oven to 350°F (175°C). Beat the remaining egg in a small bowl and brush it over the risen loaves, then sprinkle with sesame or poppy seeds if desired. Bake the challah for 25-30 minutes, until golden brown and it sounds hollow when tapped on the bottom. Remove from the oven and cool on a wire rack before slicing and serving.

This Pumpkin Challah is a true gem. Its rich golden color, delicate texture, and slightly sweet flavor make it a great addition to our table, especially during the cozy fall months. Whether you enjoy it fresh out of the oven or bake it for breakfast, this Pumpkin Challah is a great choice. I invite you to try this recipe and experience the perfect blend of traditional and seasonal flavors it brings to your table.
Print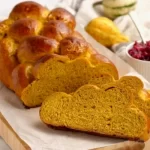
Pumpkin Challah for Rosh Hashanah
5 Stars 4 Stars 3 Stars 2 Stars 1 Star
No reviews
- Author: Chef Sophia
- Total Time: 3 hours
- Yield: 4 servings 1x
- Diet: Low Fat
Description
Celebrate Rosh Hashanah with a delicious twist on traditional Challah bread by incorporating the seasonal flavors of pumpkin. This Pumpkin Challah recipe combines the warmth of cinnamon, nutmeg, and pumpkin puree, resulting in a beautifully fragrant and flavorful bread that’s perfect for the holiday table.
Ingredients
- 1 cup warm water (110°F/45°C)
- 2 1/4 teaspoons active dry yeast (1 packet)
- 1/3 cup granulated sugar
- 1/2 cup pumpkin puree
- 1/3 cup vegetable oil
- 2 large eggs, plus 1 for egg wash
- 1 teaspoon salt
- 1 teaspoon ground cinnamon
- 1/2 teaspoon ground nutmeg
- 4 1/2 – 5 cups all-purpose flour
- Optional: sesame seeds or poppy seeds for topping
Instructions
Step 1: Prepare the Dough
- In a large mixing bowl, dissolve the yeast and sugar in warm water. Let it sit for 5-10 minutes until frothy.
- Add the pumpkin puree, vegetable oil, 2 eggs, salt, cinnamon, and nutmeg to the yeast mixture. Mix until well combined.
- Gradually add the flour, one cup at a time, mixing well after each addition, until a soft dough forms.
Step 2: Knead and Rise
- Turn the dough out onto a floured surface and knead for about 8-10 minutes until smooth and elastic.
- Place the dough in a greased bowl, cover with a clean kitchen towel or plastic wrap, and let it rise in a warm place for 1-1.5 hours, or until doubled in size.
Step 3: Shape the Challah
- Once the dough has doubled in size, punch it down to release the air bubbles.
- Divide the dough into two equal portions. Divide each portion into three equal parts and roll them into ropes, about 16 inches long.
- Braid the ropes into two loaves, tucking the ends under, and place them on a parchment-lined baking sheet.
- Cover the loaves with a clean kitchen towel and let them rise for another 30-45 minutes, or until puffy.
Step 4: Bake
- Preheat the oven to 350°F (175°C).
- In a small bowl, beat the remaining egg and brush it over the risen loaves. Sprinkle with sesame seeds or poppy seeds if desired.
- Bake the challah for 25-30 minutes, or until golden brown and hollow-sounding when tapped on the bottom.
- Remove from the oven and let cool on a wire rack before slicing and serving.
Equipment
 Buy Now →
  Buy Now →
NutriChef 3-Piece Nonstick Kitchen Oven Baking Pans
Buy Now →
Nuwave Bravo Air Fryer Toaster Smart Oven
Buy Now → Buy Now →
COOK WITH COLOR Mixing Bowls with Lids
Buy Now →Notes
- For a richer flavor, you can substitute some of the all-purpose flour with bread flour.
- Make sure your yeast is fresh and active for the best rise.
- Store leftover challah in an airtight container or freeze for longer storage.
- Prep Time: 2 hours
- Cook Time: 1 hour
- Category: OCCASION
-
Will my yeast not activate properly?
Ensure that the water is warm, not hot, ideally between 105-115°F (40-46°C). If the yeast doesn't foam after 10 minutes, it might be old or the water might have been too hot or too cold. Try using fresh yeast and carefully checking the water temperature.
-
What if my dough doesn't rise?
Place the dough in a warm, draft-free area. If your kitchen is cold, you can place the bowl in an oven that has been slightly warmed and then turned off. Covering the bowl with a damp towel can also help retain moisture and warmth.
-
What if my dough is too sticky to knead?
Gradually add more flour, a tablespoon at a time, until the dough is manageable. Be careful not to add too much flour, as this can make the bread dense. The dough should be slightly sticky but still smooth and elastic after kneading.